Module 1 Week 1 During Lab
Before starting, make sure you have your Module 1 Lab Notebook and Datasheet ready. It should already exist in Google Drive if you completed the preclass instructions. If you’re not sure where to find it, you can access it in our Google Classroom Site.
Goals for This Week
The goal of this week is to be able to successfully levitate small styrofoam beads in a standing wave of sound, and to use the positions of levitated beads to determine the speed of sound, \(V_{\rm sound}\). At the end of this week, you should have a prediction, based on your results, that anyone doing careful measurements using this apparatus is likely to obtain a \(V_{\rm sound}\) result within a certain range of values. You will express this range by quoting your experimentally determined \(V_{\rm sound} \pm \delta V_{\rm sound}\).
Instrumentation
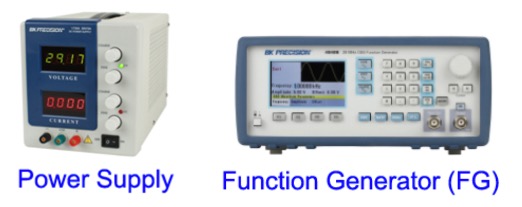
Your first goal is to create a standing wave with the acoustic levitator. At your station you will see three main pieces of equipment that will help you make this happen. First, you have a function generator (FG, shown on the right; the power supply on the left will be important later):
The periodic signal from the function generator will make the speakers produce sound of a particular frequency. Adjusting the waveform, frequency, amplitude and offset are done as follows:
- Turn on the function generator.
- Select the waveform using the buttons to the right of the display.
- Adjust the FREQUENCY using the F1 button on the function generator. Use the number pad to type in the numerical frequency desired, and then press the button with the appropriate units (Hz, kHz, MHz) to the right of the numbers; press enter when done. Note: If you would only like to adjust the frequency a bit from its present value you can also use the dial.
- Adjust the AMPLITUDE and OFFSET settings using the F2 and F3 buttons. Again, use the number pad to type in your desired value followed by a button for the units; press enter.
- Press the “ON” button above the output of the function generator to make sure it is ON (illuminated and producing a signal).
You must choose what settings on the function generator will produce sound waves that levitate beads most reliably. For now, set the function generator (FG) to create a SQUARE wave with a frequency of 40 kHz, an amplitude of 5 V, and an offset of 2.5 V. The square wave, amplitude, and offset settings work best with the logic circuit that processes the function generator signal to produce input to the speakers. The speakers themselves have the best electromechanical response near 40 kHz, but you can check that – and refine it for your particular setup – a bit later. You can turn the output OFF for now (button above the output port).
Now, turn your attention to the acoustic levitator itself:
Set the switch on the levitator to “AMP.” The switch has 3 possible positions, so make sure it is pressed all the way to “AMP.” This sets the output from the FG to be the logic input for a digital driver located inside the acoustic levitator box. A digital driver uses a logic input of “low” or “high” as the instruction to switch between outputs of 0 V and whatever voltage is supplied to it by a separate power supply (labeled PS OUTPUT (+)). Thus, the output of the driver will be a square wave oscillating at the same frequency as the function generator, switching between 0 V and the output voltage of the power supply (once you connect it).
The L298N Motor Drive Controller Board has on-board logic that needs to be powered at 5V. This is separate from the power supply voltage that will pass through the PS terminal. The 5V logic supply input is connected to a USB power adapter. You should plug this adapter in to one of the wall outlets on your bench. A red light on the L298N board will turn on.
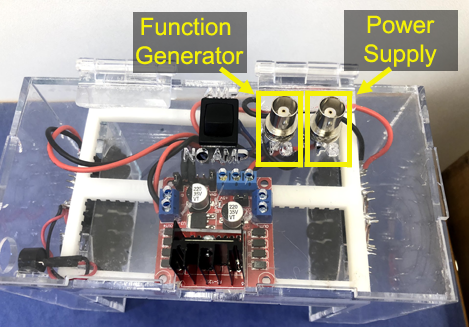
In the picture of the acoustic levitator above, the inputs for both the function generator and power supply are highlighted. There should already be BNC cables attached to both of these on your apparatus. Find the BNC cable connected to the “FG” input on the levitator case. Connect its other end to the “output” port of your function generator. Do not connect the power supply.
Safety Warning: Whenever you are connecting elements in a circuit, make sure the power supply is off. Do not turn on the power supply until you have completed the circuit. Leave the function generator powered on, so the settings you entered are preserved, but leave its output off (button above the output port not illuminated).
Finally, focus on the power supply. With the power supply turned off, turn all its front-panel knobs completely to the left (counter-clockwise) to ensure there is no voltage or current being supplied. Make sure that the negative (–, black) terminal on the power supply is connected to the ground (GND, green) terminal. This simple connection ensures that the levitator apparatus, power supply and function generator all have a common ground. If there is no metal clip connecting the black and green terminals, notify your instructor and together you can make this connection with a small piece of wire.
Find your station’s BNC/banana adapter, and connect the red banana connector to the red positive (+) output on the power supply and the black banana connector to the ground (green) output of the power supply. Connect the output of this adapter to the BNC cable already plugged in to the “PS” input on the levitator case.
Safety Tip: Never touch the two leads of the power supply together! This will short circuit the power supply and could damage it.
Now turn on the power supply. The light labeled C.V. (coarse voltage) should be green, meaning that the output of the power supply is limited by the voltage dial settings. Make sure the function generator is turned on and turn on its output (button above output port). Turn the coarse dial for the voltage slowly up (clockwise). Observe that the voltage reading on the front panel of the power supply rises, but the current stays at zero. The power supply might make clicking sounds - this is okay.
When you reach a voltage output of around 6-10 volts, the current will start to rise, the green C.V. light will go off and the red C.C. light will go on. At this point both the current and the voltage will stop rising in response to further increases of the coarse voltage dial. The red C.C. light indicates that the power supply output is now being limited by the current dial settings. Turn the coarse current dial up until the green C.V. light comes back on. Alternate between increasing the voltage setting and the current setting as necessary until you have reached an output voltage between 12 and 14 V. Do not exceed 15 V. Keep an eye on how much current the power supply is providing. If it goes above 225 mA (0.225 A) turn it down immediately and check your circuit or ask an instructor.
At this point, if all is well, your acoustic levitator is producing standing waves of sound.
Finding a Good Drive Frequency
Before levitating beads, check your standing wave’s structure and strength by visualizing it with the aid of garlic powder. As neatly as possible – no garlic powder all over the floor, please! – shake or sprinkle some garlic powder onto one of the black cardboard rectangles at your station and spread it out across the central third or half of the cardboard. Gently slide the cardboard into the cavity of the acoustic levitator, holding it near the center axis, until you see a pattern forming in the powder. Take note of the pattern (a photo might be a great addition to your lab notebook) and the speed of the garlic powder’s movement.
Now vary the frequency of the function generator signal. Select frequency and use the arrows to toggle to the tenths place on the screen. Use the dial to change the frequency by 0.1 kHz at a time. The garlic powder will form a clear pattern with stronger movement when you are at afrequency at which the speakers respond well. You may decide this is exactly 40 kHz or something slightly different, but be sure to record the frequency you choose. If several different frequencies all produce strong standing waves, you can choose any of them; there is no need to spend more than a few minutes choosing a frequency that works well.
Make sure you record which levitator you are using (they are numbered), so that you can be sure you have the same levitator next week. Different units may respond well at slightly different frequencies.
Levitating a Bead
Now try to levitate a styrofoam bead (or two or ten)!
Place a few beads on a lens wipe or dryer sheet and move them around between the speakers of the acoustic levitator, near the central axis, until they hop into position. This should not be too difficult. If beads will not levitate, double check all your connections, the function generator settings (including if the output is on), and that the light on the driver is on. See the following video for demonstrations of a few ways to load a bead into the levitator. Ask an instructor if problems persist.
Collecting Data
Once you have loaded beads into two or more adjacent nodes of the standing wave, you are ready to measure bead spacing to find the wavelength and speed of your sound waves. Before embarking on a careful – and probably time-consuming – series of repeated measurements, you should always do some explorations to troubleshoot your basic approach and find out what factors within your control are relevant to ensuring high-quality results. There is no point in carefully controlling something that changes your result by 1%, while ignoring a systematic error that shifts all your results by 20% or even a factor of two!
-
Perform and analyze a single measurement (yes, one trial) reasonably but quickly, to check that your basic approach is working. (For instance, your speed of sound should not be a few centimeters per second, or greater than the speed of light. Since others have measured the speed of sound before you, perhaps you can look up the accepted value and ensure that you are within a factor of two.)
-
Get an understanding of the repeatability and precision of your measurement. What options do you have for measuring bead spacing? Hint: you have a ruler, but you also have the ability to take a picture of the levitated beads with the ruler as a scale bar. How do your choices influence the precision you can achieve?
-
Check other factors that might affect your measurement and its reproducibility. (Creativity is encouraged!)
Make sure you are taking notes on your exploratory observations as you go so that you have a record of them (reminder: we have set up a spreadsheet for you on Google Classroom; use the “Week 1: Exploratory Observations” tab to record your data in this section. The template already set up could be a good place for you to record data, or you could modify it to fit your process.)
After settling on a method that you trust to give you reproducible (precise) and unbiased (accurate) results, take at least five separate measurements to find the wavelength of your sound waves using that method. Use the mean and S.E.M. of your wavelength results to find a value and uncertainty for \(V_{\rm sound}\). Your instructor may ask each group to share these results with the class.